selection in keyin lists

I referred to this briefly in last week’s blog about mouse selection, but on further reflection I think it’s important enough to give it its own article: the KeyIn dialog boxes let you interact with the drawing too.

Graphical Selection 

Take KeyIn Boundary Conditions for example.
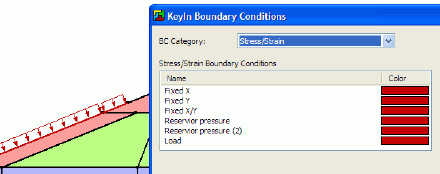
KeyIn Boundary Conditions with too many similar items

Here I want to edit the pressure on the left side of my dam, but I have six boundary conditions, all of them are red, and I didn’t do a good job of naming them.  I can tell by the symbol it isn’t one of the standard Fixed BCs but how can I remember which of the other three it is?

Easy.  Instead of selecting an item in the list, click on the edge of the dam itself.  As your mouse approaches it the cursor changes to the “Line Selection” cursor, indicating that there’s something you can click on.  When you click, it figures out you’ve clicked on the “Reservoir pessure” boundary condition and selects it in the list.

Multiple Selection

Most lists in GeoStudio (such as the list of BCs above) also support multiple selection, allowing you to change properties on more than one item at a time.

In my example above I have two “Reservoir pressure” BCs because I’m running some experiments.  They’re both Fluid Pressure with the same elevation but different gamma values.  I can select both, change the elevation one time, and both will have the new elevation while retaining all their other properties (gamma, name and colour).

When more than one item is selected, you’ll notice those fields where each item has different values will be blank; where every item has the same value the value will be displayed.
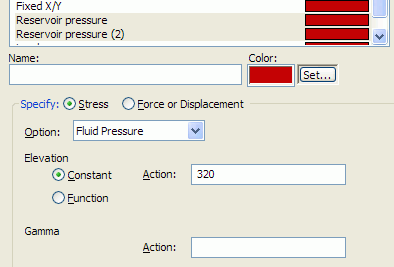
Multiple selection in a list

Multi-selection in lists follows the standard Windows approach:  ctrl-clicking (holding down the Ctrl key while you click) items in a list will add to the selection; ctrl-click a selected item to unselect it; shift-click to select a range of items (everything between your previous click and this one); double-click any item (or press Ctrl-A) to select everything.

And of course you can use the single selection, line selection and rectangular selection techniques we saw last week to graphically select straight from the drawing.

mouse selection

Continuing with last week’s theme of efficient use of your mouse, this week I’ll show the three ways to select things with the mouse.

There are three ways to select objects on your drawing:  single selection, line selection and rectangular selection.

Single Selection

This is the obvious one that everyone knows:  click on an object to select it. 

Note, though, that in some modes you also have to pick what type of object you’re going to select.  In Draw Materials, for example, you first pick from the dialog box whether you want to assign the material to regions or to lines.

Draw Materials

Line Selection

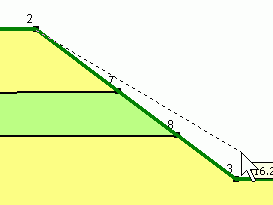
Line selection is probably the least obvious one, but it can be very helpful.  Hold down the Shift key and click once.  Continue holding the Shift key and you’ll see a dashed line following your mouse around.  Click a second time to complete the selection.  Everything on the line between the two clicks will be selected.

Line selection (also referred to as “shift-selection”) is especially useful for selecting points or lines along an angled surface.  For example, drawing boundary conditions on a slope.  (This was even more useful in v6 and older versions where you were applying BCs to the nodes, without the luxury of being able to simply click on a the line.)

Using line selection to apply a boundary condition

Rectangular Selection

Rectangular selection is another common one most of you will be familiar with.  Drag a rectangle (click the left mouse button and move the mouse without releasing the button) around the objects you want to select.  Any object that is completely contained by the rectangle will be selected.

It’s mostly because of rectangular selection that some modes (like Draw Materials) force you to choose what you want to select.  Since materials can be applied to regions or to lines, if you dragged a rectangle around a couple of regions we need to know whether your intent is to apply the material to those couple of regions or to all the lines.

All of the Draw modes support these three basic selection types, as does Modify Objects.  Even some of the KeyIn dialogs support graphical selection–try KeyIn Materials, for example, and click on a region in your drawing.  Draw Graph supports even more advanced selection, but that will be a topic for some other time.

Do you have any tricks you’ve learned that help you make the most of GeoStudio?  Leave a comment so we can all benefit!

keyin shortcuts

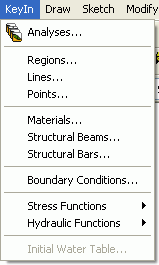
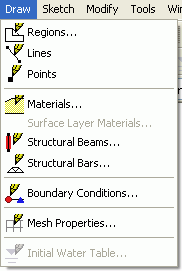
If you’re an existing user of GeoStudio you’re already familiar with the “KeyIn” vs “Draw” paradigm that’s pretty much unique to GEO-SLOPE products.  The KeyIn and the Draw menus have essentially the same items in each.

The KeyIn menu in SIGMA/W 2007   The Draw menu, also in SIGMA/W 2007

For Regions, Lines and Points, the idea is that in KeyIn you can type them in (useful if you know the exact coordinates to 10 digits of precision) but in Draw you draw them on the screen.

Materials, Beams, Bars and Boundary Conditions are a little different.  You always have to use both the KeyIn and Draw menus.  You first KeyIn the definition of the object (the material properties, for example), then you Draw that material by clicking on an existing region.

That’s straight-forward conceptually, but in v6 (GeoStudio 2004) it meant lots of unnecessary clicking.  If you’re in Draw Element Properties (now renamed to Draw Materials) and you realise you need a new material, you have to exit the mode, KeyIn Materials, add the material, close the box, Draw Element Properties again.

That’s all changed in v7.  You can still do it the old way if you want, but you don’t have to.  In fact I find the only thing I use the KeyIn menu for any more is KeyIn Analyses.  All the other KeyIn items you can reach from their Draw command.

Let’s keep looking at Draw Materials for example.  Notice the “KeyIn…” button right on the dialog box.

Notice the KeyIn button on nearly every Draw dialog box

Always start by using the Draw command.  If you need to define a new material, click the KeyIn button, define your material, and when you click Close it will already be selected for you in the Draw dialog.

In fact if you’re adding that material and you realise you need a new function for it, click that button labeled “…” – it’s a shortcut to the appropriate KeyIn Functions command (there just wasn’t room to write that all out on the button).

The “…” button is a shortcut to KeyIn Functions

Use the KeyIn buttons, define materials, boundary conditions and functions only when you need them, and you’re on the road to being an efficient GeoStudio modeler.